

 Learn how to make his doughnut marquee sign for your home by reading below!
Over the past couple of years I’ve become quite obsessed with doughnuts. I kind of forgot about them between the ages of 8-22 but have rekindled the love. The doughnut that brought back this love affair was definitely the Oreo peanut butter chocolate one from Voodoo Doughnuts in Portland. It was all downhill from there.
 There’s nothing quite like a good ol’ doughnut. That’s where the inspiration for this marquee sign came from – my love of doughnuts. Though this marquee doughnut is not edible it does light up and makes for quite the unique home accent.
 I went for a strawberry frosted doughnut with extra sprinkles but you can certainly choose whatever flavor and sprinkle amount you prefer 😉

Materials:
- Foam board
- Poster board
- Paint in various colors (I used light brown and pink)
- Globe lights
- Electric drill or nail and hammer
- Hot glue gun
- String
Doughnut marquee instructions:
- Start by drawing a large circle on your foam board and then a smaller one within that.

- Cut out around the large circle and the small circle so you have a doughnut shape.

- Cut out strips of poster about 2 inches thick and as long as the poster board.

- To make the holes in the doughnut, first count out how many lights you have on your string lights (mine was 30) then on the back of your doughnut draw a dot everywhere you want to drill for a light. Make sure that you measure the distance between each light and don’t put the dots too far apart.

- Taking a drill, carefully drill a hole everywhere you marked. Or, if you don’t have a drill, you can take a hammer and a thick nail (one as thick as the wire on the light bulb) and nail a hole everywhere there is a dot – just make sure you don’t nail it all the way through so it sticks to whatever is underneath your doughnut.

- Paint your doughnut and the strips of paper a light brown color. For the poster strips make sure you paint both sides. I found that using a circular foam brush looked the best as it didn’t leave any paint streaks.


- Once the brown is dry paint over the inside of the doughnut in pink creating the frosting.

- Once your doughnut is painted you can attach the poster board strips to the sides of the doughnut so it stands out. Using a hot glue gun, glue along the sides of the doughnut and then carefully place one of the poster board strips on it so that half is on each side. Continue doing this until your poster board strips cover the whole outside of the doughnut. Then do the same with the inside circle.

 OLYMPUS DIGITAL CAMERA
 - Glue a piece of string into a loop onto the back of your doughnut so you can hang it up.

- Take off the balls on your globe lights so you can place the lights through the holes you drilled. Thread each of the lights through the holes and then replace the ball onto the globe light.

- Tape down the battery pack to the back of your light.
- Hang on your wall and admire your handy work!

Doughnutcha wish you had this marquee sign in your home?? This DIY definitely was a fun one to make and surprisingly easy.
Make sure to check out our Home DIY Pinterest board to find other fun DIYs for your home!


 I can’t wait for Thanksgiving to be able to pile these witty copper Thanksgiving themed dinner plates high with all sorts of scrumptious food. Usually, in years past, I have started planning for Thanksgiving in October but for some reason this year I am way behind the times. What side dishes will I make?? Is turkey necessary?? How many desserts do we need???


 Hello popcorn lovers! Can you believe it’s already almost the 4th of July? What are all you doing? For me every year is different. When I was little, my family used to go to the local park and watch the fireworks with our close friends. I always loved this since they set up a carnival and rides beforehand. My dad and I used to bike down early in the day so I could play on the rides. I always remember one year he bought me a balloon and just as we left, the balloon popped because it was so hot out! I was sad so we went back and got another. We got half way home on the bike with this balloon before, POP! We ended up just going home, and my dad drove back later and got me a new balloon. I kept this one until it got small and pruney. Thanks dad 🙂


 As the weather gets warmer, all I want to eat is ice cream. Every single day. All day long. I have one of those problems where if I don’t buy ice cream then I’m fine and I wont really want it, but once it’s in the freezer, I can’t stop thinking about it and I must eat it. I have to. It calls out to me from the depth of the freezer, begging to be eaten. And I just cannot say no to that.
 Especially this ice cream. This ice cream right here is so refreshing and tastes exactly like key lime pie. I can’t get enough of it. Plus it has a secret ingredient that is too good to pass up: Oreo’s! Golden vanilla Oreo’s are crumbled through the ice cream to mimic the beloved pie crust in key lime pie.
 Plus, plus it is super easy to make and only uses 6 ingredients. That sounds like a winning combination for ice cream to me. So what will you need? Read below to find out!
 Mmmm what ice cream is easier than that? Six ingredients, all vegan, and even a bit healthy by subbing in coconut milk and sugar for regular milk and sugar. That’s my kind of dessert. Go ahead and give this 6 ingredient vegan ice cream a whirl and tell us what you think.


 We are back! It has been an amazing vacation and it has taken us a little while to get back into the swing of things but we are back to share some more yummy recipes and fun DIY’s with you. We just spent nice long weekend visiting my parents in NH where we could relax and plan a few things for the future (stay tuned!). Whilst we planned and crafted we also enjoyed trying some new recipes, one of which we are here to share with you today. This is no ordinary oatmeal. What makes it so special you ask? Well, this delicious pile of oats is made with chai tea.
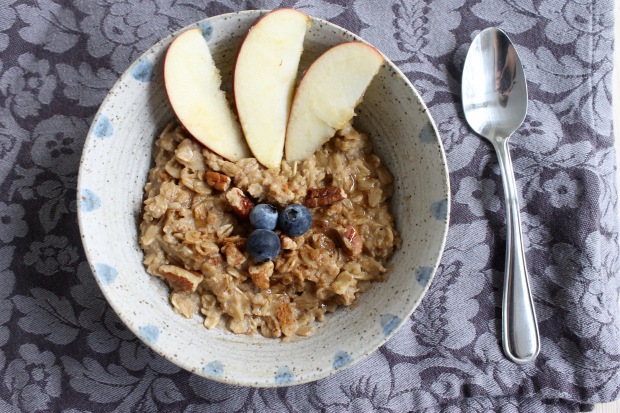 I love a good bowl of oatmeal in the morning and I also love a good cup of tea in the morning. Why not combine the tea with some chai tea oatmeal?! This oatmeal is warm, spicy, and energizing; the perfect thing to wake you up in the morning.
 That’s it! A super simple recipe to change up your morning oats. We made ours with almond milk and found it creamy and delicious but feel free to just use water. If you prefer stronger chai tasting oats then you could put two tea bags in. We drizzled ours with some honey and pecans but you can throw on any toppings you prefer.

 Did you know that the marshmallow bits in Lucky Charms are called marbits? In 1963 when Lucky Charms first came there were green clovers, pink hearts, orange stars, and yellow moon marbits. There have been numerous limited edition marbits since their release including a whale and crystal balls. Since 1963 only the pink heart remains from the original mar bit lineup.
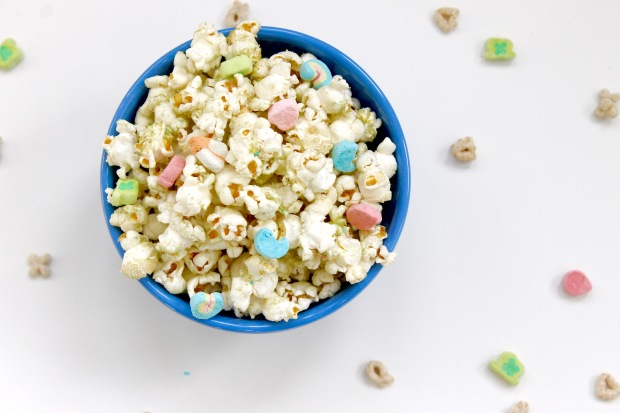 Just thought I would share some Lucky Charms factoids with you all. Sometimes I like to google random information to learn about the history…
 Want to know something else I learned in my “research”? In 1975, Lucky the Leprechaun almost got replaced with
  Fortunately for you, we aren’t here to just tell you random tidbits of information about Lucky Charms that I learned from the internet. We are actually here to share this delicious Lucky Charms popcorn recipe perfect for a little extra luck on St. Patrick’s day.
 This popcorn is crunchy and sweet and just magically delicious! Give it a try, you will not be disappointed. We added some extra marshmallows to our bowls because everyone knows that’s the best part. Pots of gold and rainbows and the red balloon! Comment below on what your favorite cereal is and if we should turn it into popcorn! Also, let us know what marbit shape you would make if you could!
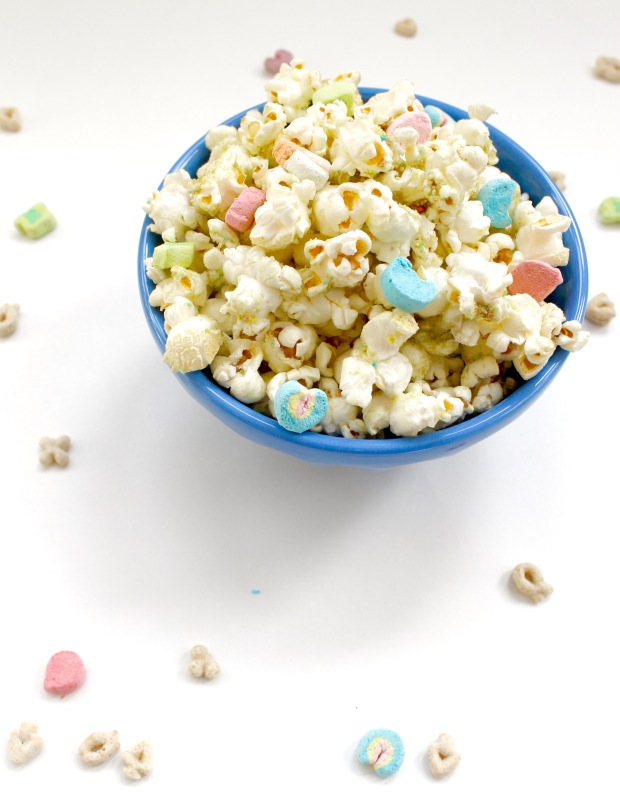


 Rose and I sometimes like to play this hypothetical game where we choose a color and then list the types of food we would be able to eat if we could only eat foods that color. For example if the color was red you could eat red apples, strawberries, red peppers, tomato sauce, etc. etc. It’s rather fun and addicting although sometimes the yummiest colored food don’t lend well to a very healthy spectrum of foods (i.e. brown for nut butters and chocolate except what fruit or veg is brown..? Potatoes? lots and lots of potatoes).
 Green would be pretty nice to have because you would get some leaves, avocado, green apples, Brussels sprouts, pesto… lots of fresh foods, although sweets would be difficult to come by (Avocado pudding??). Although, now that I think of it if you like green apple flavored things you would be able to have those lollipops and hard candies. Green apple was my go to flavor for candy – especially with jolly ranchers, so I would be pretty smitten.
 And if you chose green you would get to drink green smoothies, like this refreshing grapefruit green smoothie we have here. I mean just look at that lovely shade of green – doesn’t it make you so thirsty? There is something so refreshing about a green smoothie, especially after a workout – I can just feel the health benefits running through me. Sometimes I wonder if I’m too healthy at times… then I go eat chocolate and forget what I’m thinking about.
 Anyways, back to green foods, in particular this green smoothie. It has spinach, grapefruit (yum!!), some banana and some mango and some coconut water and that’s it! Grapefruits are fast going out of season so I wanted to take advantage of them while I can, so I’ve started adding grapefruit juice to my smoothies. It adds a nice twist to the whole smoothie, and I wonder why I’ve haven’t been doing this all winter.
 Grapefruit Green Smoothie
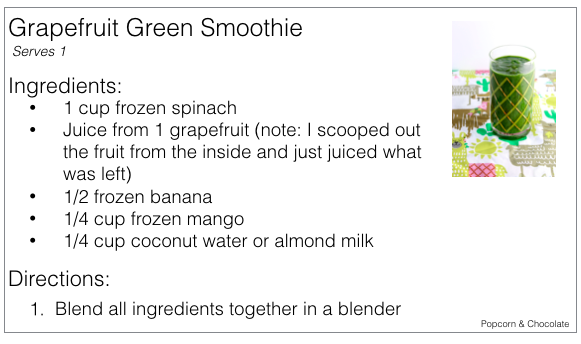


 Just over a week ago I was on vacation… sitting by a warm fire, relaxing in front of the tv with a warm cup of tea. And now is the first week back at work and it’s just as rough as I thought it would be. I did have one thing to look forward to: the new season of The Bachelor. With my friends at work, we pick
 They are cinnamony and appley and soft. I made them at home and my mom was dipping them in toffee sauce, which was delicious! So feel free to add toffee to these if you want. Also, I rolled these cookies in cinnamon and white sugar before baking since I didn’t have raw sugar on hand, but if you want to make them
  Yield: 10-12 cookies; Time: 20 minutes