DIY glittery green shamrock pins for St. Patrick's day | Popcorn and Chocolate

Glittery Green Shamrock Pin for St. Patrick’s Day

DIY glittery green shamrock pins for St. Patrick's day | Popcorn and Chocolate

You definitely won’t be pinched if you are wearing one of these glittery green shamrock pins on St. Patrick’s day. Keep on reading to find the full tutorial on how to make these resin pins! And if you want more St. Patrick’s day DIYs click here.

St. Patrick's day glittery resin shamrock pin | Popcorn and Chocolate

These pins are extra large and extra glittery so no one will be able to miss them. And if you do get pinched it is probably because someone is trying to steal this pin off your clothes!

St. Patrick's day glittery resin shamrock pin | Popcorn and Chocolate

Materials:

  • Shamrock silicone tray
  • Green glitter
  • Resin
  • Container and stirrer that will get ruined
  • Pin back
  • Hot glue gun

Instructions:

  1. Start by following the instructions on how to properly mix your resin. I would highly suggest doing this in a container and with a stirrer you can ruin because I had to throw mine away afterwards.
  2. Once the resin is mixed, stir in the green glitter. I didn’t measure this but a lot goes a long way.
  3. Immediately pour the resin mixture into your shamrock mold.
  4. Let sit for appropriate amount of time to harden.
  5. Once the shamrock is hard pop it out of the silicone mold.
  6. Glue on a pin back using a hot glue gun.
  7. Pin to your outfit and you are ready to go!


And if you want a little bit extra luck on St. Patrick’s day be sure to make our lucky charms popcorn. I’m not partial or anything but it is freaking delicious!

Shamrock resin pin DIY | Popcorn and Chocolate

Be sure to pin this pin for St. Patrick’s day!

DIY Glittery Green Shamrock Pin | Popcorn and Chocolate

DIY Cactus Shrinky Dinks Lights | Popcorn and Chocolate

Cactus Shrinky Dinks Lights

DIY Shrinky Dinks Cactus Lights | Popcorn and Chocolate

Ever since I ordered these shrinky dinks online I’ve been dreaming and scheming of ways to use them again. I like to get the most out of my craft supplies. Plus, when the craft involves sitting and coloring you best believe I will be doing it again. And again. And again.

DIY Shrinky Dinks Cactus Lights | Popcorn and Chocolate

DIY Shrinky Dinks Cactus Lights | Popcorn and Chocolate

I definitely jumped on the coloring band wagon. Well, actually, Rose and I had our own little coloring train when we were in college. We bought some of those giant coloring pages they sell at A.C. Moore in the kids section and would just sit on our dorm room floor (ew) and color them in as we watched TV. I think we bought a Spongebob one and a Zoo themed one. They were great. I still have some of those coloring pages, I couldn’t bring myself to throw them away (#hoarder).

DIY Shrinky Dinks Cactus Lights | Popcorn and Chocolate

DIY Cactus Shrinky Dinks Lights | Popcorn and Chocolate

Then once all these awesome coloring books popped up over the past couple of years I knew I had to get one (or two or three). It totally is therapeutic to just sit and color something in. As a crafty person, it’s nice to have a craft that is mindless and simple like coloring.

DIY Cactus Shrinky Dinks Lights | Popcorn and Chocolate

That’s why making these cactus light shrinky dinks was so much fun. I just got to sit and color in different cactus all day. No complaints here. I’m already thinking of other ways I can use shrinky dinks just so I have an excuse to color some more!

DIY Cactus Shrinky Dinks Lights | Popcorn and Chocolate

Keep read below to find out how to make these shrinky links cactus lights:

Materials:

  • Shrinky dinks
  • Sharpies or permanent markers
  • Scissors
  • Oven
  • Parchment paper
  • Hot glue gun
  • String lights


Instructions:

  1. Start by drawing a cactus onto your shrinky dinks. You can either free-hand this or trace an image like I did. I chose to do several different types of cactus but feel free to just do one. For size reference my drawing on the shrinky dinks was about 5.5 inches long. You want them fairly big so you can glue them onto the lights.
  2. Color in your cactus using different sharpies.
  3. Cut out your cactus. I found that when I completely around the whole cactus – hugging the cactus the whole way – that this was more likely to curl and stick on itself in the oven. To remedy this I started to just cut mostly around the cactus but didn’t hug it and left some blank space between stems if there were multiple peaks.
  4. Pre-heat your oven to 325ºF and then place your cactus shrinky dinks on a piece of parchment paper on a baking sheet. Put in the oven for about 3 minutes. Keep an eye on them – they will first curl up and then eventually (if all goes well) uncurl and lay flat again. This was taking about 3 minutes for me but might be shorter for your oven so just keep an eye on them.
  5. With your hot glue gun glue on two dots on the back of your cactus shrinky dink. Then firmly press onto the string lights between the actual light. Repeat this process with all of your cactus.
  6. Plug in your lights and enjoy! Just as a warning I would make sure you were always in the room when these are on and to not leave them on for a super long amount of time just because I’m not sure how the plastic will fare with the light.


DIY Cactus Shrinky Dinks Lights | Popcorn and ChocolateNow you just have to find a cute place to hang up your cactus shrinky dinks lights! I think I’m going to put mine around my desk. I already have my cactus piñata sitting there so it seems only appropriate to add some more cactus paraphernalia.

DIY Cactus Shrinky Dinks Lights | Popcorn and Chocolate

If you want more cactus and succulent themed DIYs/ideas check out this Pinterest board!

DIY embroidered throw pillow | Popcorn and Chocolate

Embroidered Home Sweet Home Throw Pillow

DIY Embroidered Home Sweet Home Throw Pillow | Popcorn and Chocolate

I love coming home to a cozy house and a inviting couch full of fluffy throw pillows. This DIY embroidered throw pillow says it all – home sweet home. In my dream apartment I’ve got a huge couch just bursting to the brim with throw pillows to the point where you don’t know where to sit. This embroidered pillow will be sitting in the center of it.

DIY embroidered throw pillow | Popcorn and Chocolate

Doesn’t this pillow make you just want to curl up on the couch?? If so, you can find the full tutorial on how to make this DIY embroidered throw pillow over on Homedit.

Embroidered home sweet home pillow | Popcorn and Chocolate

Click here for the full tutorial.

Or pin this image if you want to check it out later! And if you are looking for more home decor DIYs click here!

DIY Embroidered home sweet home throw pillow | Popcorn and Chocolate

DIY emoji heart valentine with free printable | Popcorn and Chocolate

Heart Eyes Emoji Valentine with Free Printable

Heart eye emoji pin for Valentine's day with free printable | Popcorn and ChocolateValentine’s day is right around the corner and if you are stuck as to what to get your friend/S.O./mom we’ve got the perfect DIY for you! These heart eye emoji Valentines are simple to make and even more fun to give away. Plus, using shrinky dinks totally takes you back to your 90’s – crimped hair and slap bracelets not included.
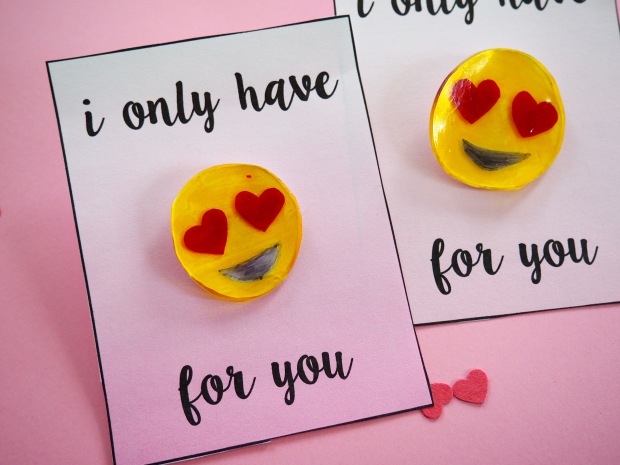
Heart eye emoji pin for Valentine's day with free printable | Popcorn and Chocolate

We’ve included a free printable Valentine to go along with the heart eye emoji pin. So now all you have to do (besides make the pins) is decide who you have heart eyes for! Olive, I’m looking at you.

DIY valentine emoji pin with free printable | Popcorn and Chocolate

Materials:

DIY emoji heart valentine with free printable | Popcorn and ChocolateInstructions:

  1. Trace or free hand a heart eye emoji onto your shrinky dinks using a yellow sharpie. For size reference mine was about 3.5 in diameter. Once you have traced the emoji, color it in using red, yellow, and grey sharpie.DIY emoji shrinky dink pin | Popcorn and Chocolate
  2. Cut out the emoji.
  3. To shrink the shrinky dinks you can either follow the instructions on the package (in the oven at 325°F for 2-3 minutes; make sure to place them on parchment paper) or you can use a heat embossing tool for about 1-2 minutes. Again, make sure to put them on parchment paper so they don’t stick to your surface. The shrinky dinks will shrivel up and then begin to flatten out – once they are flat again they are done.
  4. Taking some plain white paper, trace the size of the emoji on it and cut it out. Glue this to the back of the emoji using Mod Podge. This is so you won’t see the pin back through the pin.DIY emoji shrinky dink pin | Popcorn and Chocolate
  5. Using a hot glue gun, glue on the pin & back to the white paper.DIY emoji shrinky dink pin | Popcorn and Chocolate
  6. Print out our free printable and stick the heart eye emoji in the middle of it.

Now you have a cute, homemade Valentine to give away to your loved one! Be sure to check out our Pinterest board for more Valentine’s day DIYs!

DIY emoji heart valentine with free printable | Popcorn and Chocolate

Download the free printable Valentine card to go with your emoji pin by clicking here

DIY heart eye emoji pin with a free printable Valentine's day card | Popcorn and CHocolate

DIY XO Glittery Wine Stoppers for Valentine's Day | Popcorn and Chocolate

XO Glittery Wine Stoppers

DIY XO Wine Stoppers | Popcorn and ChocolateValentine’s/Galentine’s Day is coming right up! If you are still in need of a simple gift or a cute decoration keep reading to find out how to make these XO glittery wine stoppers!Glittery XO Wine Stoppers | Popcorn and ChocolateI feel like this year is just flying by… I say that every year, but how is it almost Valentine’s day already? I was happily celebrating my birthday last weekend in Portland, ME with Rose and I blinked and this week is already over! To be completely honest I’m not someone that really looks forward to the big v-day. Even when I was dating someone I never was super thrilled about the holiday. Glittery XO Wine Stoppers | Popcorn and ChocolateDon’t get me wrong, I love love love all the pink and hearts that are everywhere, just the actual day is a little cringe-worthy. I much rather celebrate by throwing a big Galentine’s day party with friends and eat sweets and drink wine and make some crafts, but tbh, I would always rather being doing that. DIY XO Glittery Wine Stoppers for Valentine's Day | Popcorn and ChocolateDIY XO Glittery Wine Stoppers for Valentine's Day | Popcorn and ChocolateThese glittery XO wine stoppers would be the perfect decoration to add to your bar cart at your Galentine’s day party. Orrrr you could make the X’s and O’s ahead of time and let everyone decorate their own! Sometimes I think I’m a party planner. But doesn’t that sound like a fun party?? Drink some wine, craft, eat some popcorn and chocolate. Seems perfect to me. DIY XO Glittery Wine Stoppers for Valentine's Day | Popcorn and Chocolate

Materials:

Instructions for XO wine stoppers:

  1. Make your plaster by following the instructions on the bottle and then pour it into your silicone tray in the X and the O. Let dry for the allotted time it says on your Plaster of Paris (about an hour).Plaster XO wine stoppers | Popcorn and Chocolate
  2. Once the X and O have dried, pull out of the tray and if you want to paint yours this would be the time to do so. As you can see I painted one set pink and left the other plain. Let dry.Painted plaster xo wine stopper | Popcorn and Chocolate
  3. Take your paint brush and dip it into the mod podge then paint on the glue in the areas that you want glitter to be. I sort of did a dip-dyed look with mine. Painted plaster xo wine stopper | Popcorn and Chocolate
  4. Pour the glitter onto your letters. Let dryGlittery plaster xo wine stopper | Popcorn and chocolate
  5. Taking a hot glue gun, glue your letter onto a wine cork.

    Glittery plaster xo wine stopper | Popcorn and chocolate

    Ew ew ew please excuse all the dog hair in this picture. Blame olive if you must.

  6. Open a bottle of wine and stick your new cork in!

Glitter XO wine stoppers | Popcorn and ChocolateLet us know in the comments below what you are doing for Valentine’s day – even if that is just sitting on the coach and watching Netflix all day (we won’t judge)! Be sure to comment/like/subscribe if you enjoyed this post and feel free to pin it for later if you want to!

Xoxo, Haley


DIY Glitter XO Wine Stoppers for Valentine's Day | Popcorn and Chocolate

DIY Flamingo Piñata | Popcorn and Chocolate

DIY Flamingo Piñata

DIY Flamingo Piñata | Popcorn and ChocolateWe are taking a slight break from the typical Valnetine’s DIYs and Super Bowl goodies that should be going up right about now to share with you a fun DIY I made for my birthday that was on Sunday. It’s still pink though so it might be able to pass for Valentine’s Day.DIY Flamingo Piñata | Popcorn and ChocolateActually, this DIY flamingo piñata might do pretty well at a Galentine’s party if I do say so myself. It’s pink, it’s full of candy, it’s a flamingo – perfect for any party really.DIY Flamingo Piñata | Popcorn and ChocolateYou might be wondering why I chose a flamingo piñata of all things. Well, to be perfectly honest, I’ve seemed to have collected or made a lot of flamingo themed things this past year. I guess when you’ve got a whole flock of flamignos around you you sort of become associated as the flamingo lady, a title I will gladly hold.DIY Flamingo Piñata | Popcorn and ChocolateDIY Flamingo Piñata | Popcorn and Chocolate
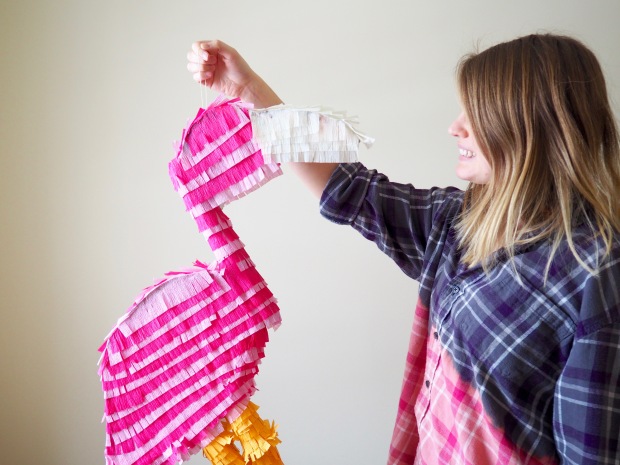
You also might be wondering why flamingos of all creatures. I’m not too sure tbh. Maybe it’s because they are pink or that they stand on one leg or that they have funny necks, who really knows – just call me crazy flamingo lady and leave it at that.DIY Flamingo Piñata | Popcorn and ChocolateI knew I wanted to make a piñata for my birthday since I made one for Rose’s and made a cactus one, it was just a matter of what to make a piñata of. Looking back on the year flamingos seemed to come up more than once so it was a pretty easy decision from there. Now we’ve got a nice little flamingo added to our ever growing piñata collection.DIY Flamingo Piñata | Popcorn and ChocolateMaterials:

  • Cardboard boxes – cereal boxes worked really well
  • Cardboard paper towel rolls and/or toilet paper rolls
  • Exacto knife
  • Hot glue gun
  • Streamers in pink, orange, and white
  • Mod Podge
  • Paint brush
  • Scissors
  • A helping hand

How to make the flamingo piñata:

  1. I apologize in advance for the pictures of this DIY – I needed both my hands to do most of the steps so it was a bit tricky photographing it as well, but I will do my best to describe the process. Start with drawing a flamingo body shape onto cardboard and cut out using an exacto knife. Trace this body onto another piece of cardboard and cut that out as well. DIY Flamingo Piñata | Popcorn and Chocolate
  2. Cut out a lot a lot of strips of cardboard about 2 inches across – these will be what connects the two layers of the flamingo body (and the rest of the flamingo later). I found the sides of cereal boxes were the perfect size. DIY Flamingo Piñata | Popcorn and Chocolate
  3. Cut out a head shape and then trace it onto another piece of cardboard and cut that out as well. DIY Flamingo Piñata | Popcorn and Chocolate
  4. Cut out two feet shapesDIY Flamingo Piñata | Popcorn and Chocolate
  5. Now it’s time to glue the two layers together. This is when a helping hand is needed. Take the two layers of the flamingo body and put hot glue on the sides of each of them then quickly place down one of the 2 inch across strips as far as it will go along the body. Do this across the top of the body and most of the bottom – but make sure to leave room for the legs. DIY Flamingo Piñata | Popcorn and Chocolate
  6. To make the legs I used 1 paper towel roll and 3 toilet paper rolls. Place the straight paper towel roll in between the two layers of the body and glue it down with hot glue. To make the bent leg place 1 toilet paper roll in between the two layers of the body and glue it there. Slightly bend another toilet roll and glue it to the first toilet paper roll. Add a third toilet paper roll to the bottom. DIY Flamingo Piñata | Popcorn and Chocolate
  7. For the neck of the bird glue 1 paper towel roll to the body.DIY Flamingo Piñata | Popcorn and Chocolate
  8. For the head, glue each of the two layers to the top of the paper towel roll. Then take another cereal box strip and glue it between the two head layers. DIY Flamingo Piñata | Popcorn and ChocolateDIY Flamingo Piñata | Popcorn and Chocolate
  9. Glue the feet to the bottom of the two legs.
  10. Now you should have a full flamingo body and can start adding the streamers. To do this start at the bottom of the flamingo (so the legs) and wrap the streamer around the area you are going to put it then cut it to that size. DIY Flamingo Piñata | Popcorn and Chocolate
  11. Add small cuts to one side of the streamer to create the fringe.DIY Flamingo Piñata | Popcorn and Chocolate
  12. Add glue to the top part of the streamer where you didn’t add the fringe. Then carefully glue it onto the birdDIY Flamingo Piñata | Popcorn and ChocolateOLYMPUS DIGITAL CAMERA
  13. Continue doing this all the way to the top.
  14. To do the back and top of the head (the cereal boxes) just cut small strips and layer them like you did for the body. Before you do the top of the head make sure to hot glue on a string so it can hang. DIY Flamingo Piñata | Popcorn and Chocolate


Now your flamingo is ready to mingle! DIY Flamingo Piñata | Popcorn and ChocolateOLYMPUS DIGITAL CAMERA

Peace out 24 and hellooo 25! Now I’m taking this flamingo and adding it to my piñata collection.  If you have any suggestions as to another piñata I should attempt – leave them below! Also, if you have any good names to give this pretty lady comment them below! Happy crafting!

DIY Flamingo Piñata | Popcorn and Chocolate

Click here for some more piñata ideas! May I suggest a cactus?

DIY Agate Napkin Rings | Popcorn and Chocolate

Simple Agate Napkin Rings

DIY Agate Napkin Rings | Popcorn and Chocolate

Admittedly these agate napkin rings were meant for our Thanksgiving table but we had so many other great Thanksgiving crafts going up that they just didn’t make it in time for Thanksgiving. It would be a shame to have to wait until next Thanksgiving to share these simple agate napkin rings so before we dive into our Valentine’s day crafts we thought we would sneak these guys in.

DIY Agate Napkin Rings | Popcorn and Chocolate

These agate napkin rings don’t have to just be for Thanksgiving – they are perfect for any holiday table or just a fancy Friday night! You could even set them up for a romantic Valentine’s day table for your special someone 😉

DIY Agate Napkin Rings | Popcorn and ChocolateDIY Agate Napkin Rings | Popcorn and Chocolate

Head on over to Homedit to find the full tutorial for these agate napkin rings.

DIY Agate Napkin Rings | Popcorn and Chocolate

Click here for the tutorial.

DIY iron-on slogan beanie | Popcorn and Chocolate

Easy Iron-On Slogan Beanies

DIY slogan beanie | Popcorn and ChocolateI am living in this iron-on slogan beanie because it is currently freezing here in New England. This morning it was 3 degrees. THREE.

DIY iron-on slogan beanie | Popcorn and Chocolate

Don’t get me wrong I actually love winter – it’s my favorite season – but 3 degrees is a wee bit chilly for even me. Good thing I have all these slogan beanies to keep my head warm.

DIY Slogan beanies | Popcorn and Chocolate

Slogan beanies | Popcorn and Chocolate

Despite the constant hat hair, I live in beanies in the winter. I’ve got a collection that is ever growing but I’ve been reaching for these slogan beanies to add a fun kick to my all black winter ensemble.

DIY iron-on slogan beanie | Popcorn and ChocolateDIY Iron-on Slogan beanies | Popcorn and ChocolateDIY iron-on slogan beanie | Popcorn and ChocolateLucky for you they are super easy to make and only involve a beanie, some iron-on letters and an iron. No sewing involved – my kind of craft!

DIY iron-on slogan beanie | Popcorn and Chocolate

DIY iron-on slogan beanie | Popcorn and ChocolateDIY Slogan beanies | Popcorn and ChocolateThe best part about these slogan beanies is that you can choose what slogan you want on yours! I’ve gone with the appropriate permanent hat hair because that is me for 3 months of the year. I also have snow day because who doesn’t love a good snow day!? Lastly, I made a sleigh hat – more for Christmas, but could be worn all year round if you just want to be reminded to sleigh all day everyday.

DIY Iron-on Slogan beanies | Popcorn and Chocolate

Materials:

  • Beanie
  • Iron-on letters – if you want a longer slogan I suggest using smaller letters
  • Iron

DIY Iron-on Slogan beanies | Popcorn and Chocolate

To make the slogan beanies:

  1. First determine what you want your slogan to be then lay out your letters on your beanie.DIY Slogan beanies | Popcorn and Chocolate
  2. Turn on your iron and firmly press on top of the letters to iron them down. Hold iron on top of the letters for a couple of seconds or for however long the packaging says for.DIY Slogan beanies | Popcorn and Chocolate
  3. Let cool for a second then put on your head and proceed to wear the rest of the winter.

DIY iron-on slogan beanie | Popcorn and Chocolate

Enjoy your snow days and permanent hat hair from these simple and fun DIY iron-on slogan beanies! Let us know in the comments below if you make these hats and what your slogan was – we’d love to hear from you!

DIY Slogan beanies | Popcorn and Chocolate

DIY iron-on slogan beanie | Popcorn and Chocolate


DIY Slogan beanies | Popcorn and Chocolate