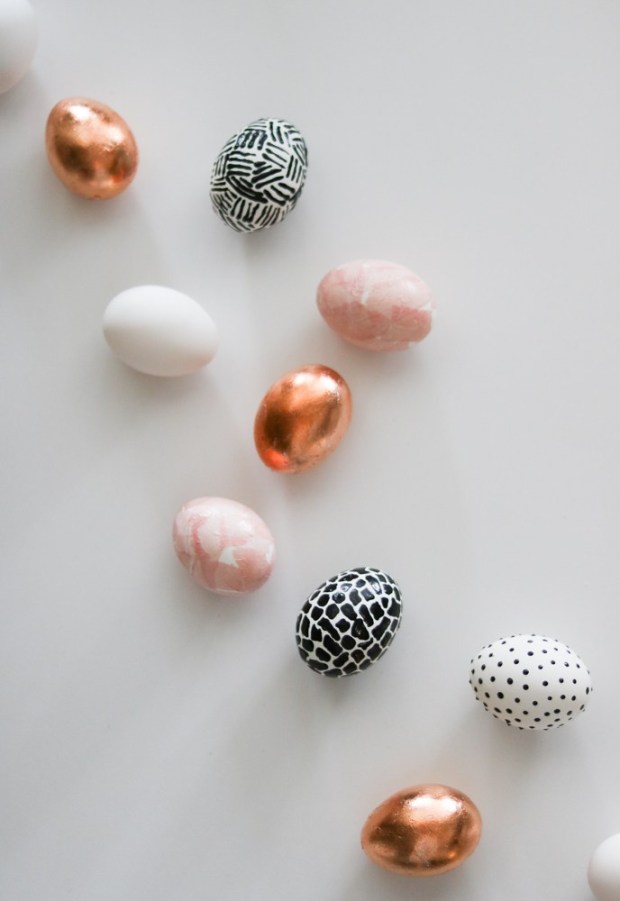
Easter is fast approaching and that means you gotta get all your ducks (or eggs) in a row for the big day. Luckily, today we’ve got the ultimate Easter egg DIY roundup for you! There are so many incredible and fun Easter egg DIY’s out there that I just wanted to share them all with you! Let us know in the comments if you try any of them or which one is your favorite. I definitely will have to stock up on eggs next time I’m at the store.

I don’t even know where to start all of these DIYs are so clever but I guess we should jump right in, yes? As a disclaimer: none of these images are my own, I have linked the source of the DIY to the owner.
1. DIY Temporary Tattoo Easter Eggs, by The Crafted Life
How fun are these?? Warning: I’m probably going to say that about every egg. But I’m loving the tattoo choices here!
2. DIY Celebrity Easter Eggs, by Studio DIY
These eggs just crack me up! Also, fun fact, Oprah is speaking at Skidmore’s graduation this year… not bitter about this or anything. 
3. Mr. Potato Head Easter Eggs, by The Glitter In My Tea
These guys are so stinking adorable I can’t get over it! Also, don’t know how Amy cut out such tiny hats and glasses!
4. DIY Tamagotchi Pet Easter Eggs, by Brite And Bubbly
Keeping in line with the 90’s toys throw back – who remembers playing with Tamagotchi’s??? Fabulous!
5. DIY Pink Pineapple Easter Eggs, by Best Friends For Frosting
I’m kind of really obsessed with these pineapple eggs! Anything and everything pineapple please!
6. DIY Typography Sand Art Easter Eggs, by Aww Sam
These eggs are definitely cool beans!
7. Pain Splattered Easter Eggs, by Squirrely Minds
Splatter away with this simple DIY!
8. DIY Constellation Eggs, by Kittenhood
These eggs are out of this world (sorry for all the bad puns, but it comes with the territory)
9. DIY Stars And Moons Easter Eggs, by Homey Oh My
If a whole constellation is too daunting, try some moon and stars!

10. Modern Easter Eggs, by Lily Ardor
These trendy little eggs will be sure to get all the compliments
11. Fruit Stamped Easter Eggs, by Delineate Your Dwelling
These fruity eggs are adorable!

12. Marbled Easter Eggs, by Oh So Beautiful Paper
If it’s marble, count me in!

13. Sprinkle Easter Eggs, by Studio DIY
We all need more sprinkles in our lives!

14. Easter Bunny Eggs, by Little Red Window
What’s Easter without some bunnies??

15. Graffiti Art Easter Eggs, by Paper & Stitch
Take your graffiti off the streets and onto your eggs for this DIY!

16. Cactus Easter Eggs, by Delia Creates
Oh my cacti! Love these little guys!

17. Tropical Leaf Easter Eggs, by Oh So Beautiful Paper
Feeling the tropical vibes? Try these tropical leaf eggs!

18. Pastel Marble Eggs, by Bespoke Bride
Pastel and marble? Yaaasss!

19. Typography Easter Eggs, by Lovely Indeed
So many eggcelent Easter puns!

20. DIY Snowflake Easter Egg, by Motte Blog
Keep a bit of winter alive with these fun snowflake eggs!

21. DIY Avocado Easter Eggs, by Aww Sam
Avocado and eggs is always a winning combination in my book!

22. DIY Burger Eggs, by Studio DIY
And if you don’t like avocados, try these burger eggs instead!

23. Ice Cream Cone Eggs, by The Decorated Cookie
Feeling extra sweet? Try these ice cream cone eggs!

24. Ombre Easter Eggs, by The Crafted Life
Love me some ombre!

25. Otomi-Print Easter Eggs, by Homemade Banana
Loving the bright and colorful pattern on these eggs!

26. Gold Leaf Easter Eggs, by Artful Days
The best golden eggs ever!

27. Confetti Dipped Easter Eggs, by Studio DIY
Gold? Confetti? And color block?? Yes, yes, and yes please!

28. Pantone Easter Eggs, by A Kailo Chic Life
Such a clever idea for an egg!

29. Mud Cloth Inspired Eggs, by A Charming Project
I might be partial, but I’m loving these mud cloth eggs!

30. Black And White Swan Eggs, by Design Is Yay
How clever are these swan eggs??

31. Modern Brushstroke Easter Eggs, by Idle Hands
These eggs look so simple and so elegant!

32. DIY Moss Design Eggs, by The Merry Thought
Moss on eggs? Who knew this combo would be so great!

33. Watercolor Floral Eggs, by Dream A Little Bigger
If moss isn’t quite your thing, try out these pretty watercolor floral eggs!

34. Confetti Easter Eggs, by Alice and Lois
You can never go wrong with a little confetti!

35. DIY Emoji Easter Eggs, by Studio DIY
Express yourself with these emoji eggs!

36. DIY Hot Dog Easter Eggs, by Brite & Bubbly
Hot diggity dog!

37. Banana Split Easter Eggs, by The Glitter In My Tea
If you couldn’t tell by now, I love food. The one thing I love more than food itself is a food themed DIY like this amazing banana split easter egg DIY!

38. Sprinkle Easter Eggs, by Let’s Mingle
I don’t much like jimmies on my ice cream but on my eggs, yes way!

39. Hologram Foil Easter Eggs, by Oh So Beautiful Paper
All about that holo life? We got something for you too!

40. DIY Unicorn Easter Eggs, by Little Inspiration
These unicorn eggs have to be the cutest things ever!

There you have it, an amazing list of 4o different Easter egg DIYs! So tell me, which was your favorite?? Have you tried any of these DIYs before? If you’re looking for other, non-egg related Easter DIYs be sure to check out my Pinterest as well as these cute bunny erasers I made!

Like this:
Like Loading...


 these patterned bandanas are quick and simple to make, keep reading to find out how!
 Patterned bandanas are all the rage right now. I’m a huge fan of the whole bandana trend that is popping up. I’ve been trying to sneak in patterned bandanas in my all my outfits but get a little tired of the plain bandana print. But with these easy patterned bandanas you can put whatever design you want on your bandanas!
 I went with some fairly simple designs for my bandanas but if you are a good artists, go wild! These patterned bandanas are so much fun to wear around your neck or pinned up in your hair. You could even attach to your favorite bag as a little bag flair!


 There you have it! An easy DIY to change up your bandanas. I’ve been wearing mine as much as I can and love having so many different patterns to choose from!

 Mother’s day is this weekend and if you are stumped as to what to get your lovely mom, look no further! We’ve got a free printable that you can just print out and wrap around a bouquet of flowers and b(l)oom you’re all set! Who doesn’t love getting flowers??

 I’m super duper excited for peonies to start blooming. If you are lucky enough to have peonies blooming right now you should definitely print out this free printable mother’s day bouquet wrapper and wrap up a big ol’ bunch for your mum.
 Happy Mother’s day to all you lovely, amazing, strong moms out there! And happy Mother’s day to the
 That’s it! Just print and go! It even makes a great last minute mother’s day gift idea, don’t worry we won’t tell anyone it was last minute though ;)

 Show your mom you love her this Mother’s day by getting a tattoo… or make this DIY felt mom heart patch instead! Personally, I like the less permanent and less painful version more. Keep reading to find out how you can make this non-painful mom heart “tattoo” patch
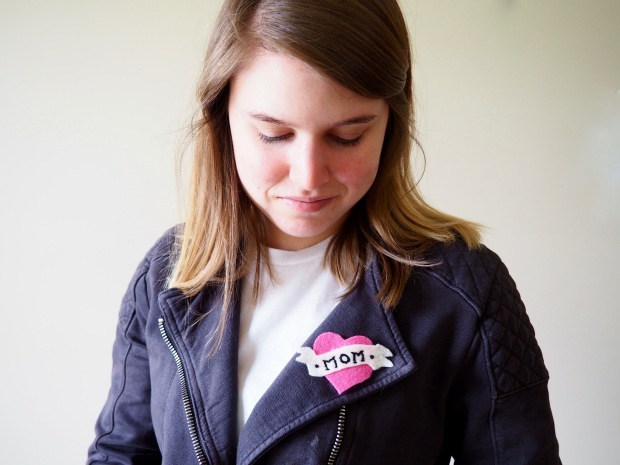
 This felt patch is very simple to make and it looks great ironed onto your favorite jacket or cardigan. You could even make it into a pin instead of a patch if you want to wear it on everything. Your mom will sure love it when you wear it out on Mother’s day!


 Show your mom how much you love her by creating this DIY felt mom heart patch, it’s almost as badass as getting the full-blown tattoo. Less painful too, unless you accidentally stab yourself with your needle (guilty).

 Learn how to make his doughnut marquee sign for your home by reading below!
 There’s nothing quite like a good ol’ doughnut. That’s where the inspiration for this marquee sign came from – my love of doughnuts. Though this marquee doughnut is not edible it does light up and makes for quite the unique home accent.
 I went for a strawberry frosted doughnut with extra sprinkles but you can certainly choose whatever flavor and sprinkle amount you prefer ;)


 If you love marble and simple projects then try making this marbled clay vase! Scroll down to find the full tutorial.
 I’m a big fan of
  Simple crafts is what we are all about at Popcorn & Chocolate. Simple and cheap (but not cheap looking)! This DIY marbled vase is no exception. All you need to make it is some black and white Sculpey and an oven. Easy peasy.


 Keep reading to find out how to make these DIY clay bunny planters!


 Keep reading to find the full tutorial for these cute and simple bunny erasers for Easter (or anytime really)!


 Learn how to make these fun and colorful mud cloth inspired plaster keychains by reading below!


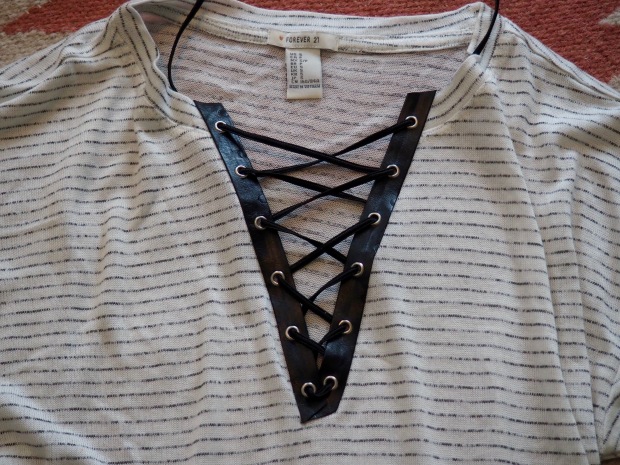
 I’ve been seeing lace-up shirts everywhere lately. And when you start seeing something everywhere and you are a DIY blogger then it is only your duty to create said item. In this case, a lace up shirt.