Neon Pineapple Light-Up Sign

DIY Neon Pineapple Sign | We're Going to Make itUmmm, hello, neon pineapple light-up sign? This is what my dreams are made of, no really though, I have some pretty crazy dreams. This sign though, is gold, or should I say pineapple?

Sometimes I surprise myself with the diy’s I come up with. Does that ever happen to you? This neon light for example, only someone who is crazy about pineapples as I am would want a neon pineapple sign in there house.DIY Neon Pineapple Sign | We're Going to Make it

Materials:

  • Piece of plywood
  • El wire in green and yellow  – I bought both colors in 9ft and found this plenty long enough
  • Drill

How to make this neon pineapple sign:

  1. If your piece of plywood is not the size you wish it to be, cut it down to the size you want by using a saw. Alternatively, if you are picking up your wood at Homedepot they can cut it for you.
  2. Draw out the pineapple onto the front side of the plywood in pencil. I just free-handed mine but feel free to print out an image online and use it as a stencil. Just as a disclaimer, it will be very very hard to make curved lines so you will want to make sure all your lines are straight.
  3. Now comes the tricky part, determining where to drill the holes. The wire has to go in and out  right next to each other, so you will always have 2 holes side by side. Starting at the bottom left side of the pineapple I drew small dots and labeled each one with a number so I would know where to thread the wire in and out. I’ll go more into how I made the shape below, I just wanted to give a general idea of what you will be doing.DIY Neon Pineapple Sign | We're Going to Make it
    DIY Neon Pineapple Sign | We're Going to Make it

    It’s helpful to use string to run through your holes as you go along


    Making the pineapple bottom

  4. This is how I made the outer yellow pineapple shape: I started by drawing a small dot for the bottom left part of the pineapple. Next, using a ruler to make sure the bottom was flat, I drew a second dot about 6 inches away. I drew another dot about a fourth of an inch away from that one and did the same process of using a ruler and drawing another dot about 6 inches away. I made the line go slightly towards the right to start to form the pineapple shape. You will want to follow your basic pineapple outline you drew. Continue this process of drawing a dot and then another one a little further away around the whole outer yellow pineapple.
  5. Once you get back to the bottom of the outer pineapple it is time to work on the inside hatches. To do this you will work in a similar pattern of creating a dot and then another one further away so the wire can go in and out. I drew my dots close to where the ones were for the outer pineapple as a guideline. So, draw your first dot in the bottom left corner and then your 2nd dot at a diagonal up to the right hand side. The next dot I created was a little further up and then I brought the diagonal back down to the left side. I did this once more so you are ending in the top right corner of the pineapple base. Your next dot will be on the top left side and you will do the same thing going down the pineapple. Make sure you are marking each dot with a number as you will need this to know where to thread the wire.

Making the green pineapple leaves

  1. Start on the bottom left hand side and draw your dot. move about 6 inches to the left slightly on a diagonal and draw another dot. Draw a dot right next to that one and then move about 4 inches (or more depending on your leaf shape) to the right and draw another. Draw another dot right next to that one and then continue the process of moving on a diagonal to create the leaves.

And the rest:

  1. Now that you have all your holes drawn, it is time to drill. You will being drilling a hole on every dot that you drew. Safety first! Make sure you do this carefully and safely.
  2. Once all of the holes are drilled you can sand down any sharp bits.
  3. Grab your yellow wire and bring it through the first hole that you made. Thread it through to the 2nd hole. It’s kind of like connect the dots, so continue to thread your wire through the holes following the numbers. This is where the numbers come in handy.
  4. Do the same with the green wire.
  5. Tape any excess wire to the back of the plywood.
  6. Erase the pencil marks on the front of the plywood.
  7. Pop some batteries into your el wire and watch your pineapple glow!

Don’t forget to pin this neon pineapple to make later!

DIY Neon Pineapple Sign | We're Going to Make it

6 items to make your house a home and a simple no-sew pillow diy | We're going to make it

6 New Home Essential and a Quick No-Sew Pillow DIY

Casper and I have created a list of 6 new home essentials that make your new house or apartment feel like a home. All of these items will help you feel right at home in your new place. Check out our list below and read on to find out why I chose each of these items!

6 essentials for your new home | We're going to make it

As you may or may not know, I plan on moving across the country sometime in the not too distant future. I do not know where I am moving and I don’t know when, but when I do I will be sure to pack all of these essentials with me! I’ve moved apartments a couple of times in the past few years and with each move I think I’m getting a little better at unpacking our stuff and settling in. Items like some art and plants and a good mattress definitely help expedite this process of making your home feel, well, homey. And let’s face it, moving is not fun, so anything to help this process along is a plus in my book. First on my list of new home essentials? A rug!

6 items to make your house a home and a simple no-sew pillow diy | We're going to make it

Rugs!: I hadn’t realized the magic of a rug until I bought my first one from West Elm on super sale. I fell in love right away, and still have it to this day. I cannot stress this enough, a rug really can pull a whole room together. Finding the perfect rug can be tricky (so many options!), but once you do it really makes your home feel complete.

6 items to make your house a home and a simple no-sew pillow diy | We're going to make it6 items to make your house a home and a simple no-sew pillow diy | We're going to make it

Artwork: This is where your personality can really show through your home. Art can be anything from a photograph of you and your dog to a painting you bought (or made!). In my home I like to display wall weavings that I made as well as photographs, like this amazing one my brother took. I’m also a sucker for an inspirational quote or two. Artwork adds some fun flair to your walls and is one of those things that you can easily save money on by DIYing it. You can print out photographs and frame them yourself or grab some paint and a paintbrush and make your own unique piece!

6 New Home Essentials and No Sew Pillow DIY | We're Going to Make it6 New Home Essentials and No Sew Pillow DIY | We're Going to Make it

New Mattress, Sheets, and Pillows: This is probably one of the most important things you will want in your new home – a new mattress and bedding. This adds instant coziness to your bedroom. Moving a mattress across states is a huge pain (believe me, I’ve done it multiple times). I’d much rather order one from Casper and have it show up at my doorstep in a neat little box. They really take all the struggle out of buying a new mattress, no more lugging a queen size mattress through tight stairwells wondering if it will ever make it your bedroom.

6 items to make your house a home and a simple no-sew pillow diy | We're going to make it6 items to make your house a home and a simple no-sew pillow diy | We're going to make it

Plants – lots of plants!: It’s no secret that I love my plants so of course they are on my list! I feel like plants just make your house feel alive. You can get tall ones, small ones, air plants, anything your heart desires! My heart desires all so my room is full of random succulents and cactus that I just can’t resist.

6 items to make your house a home and a simple no-sew pillow diy | We're going to make it6 items to make your house a home and a simple no-sew pillow diy | We're going to make it

Decorative Pillows: Instant coziness is a couch or bed full of fluffy pillows. I’m one of those people who likes to switch out my pillow with the seasons #noshame. I understand decorative pillows can get pretty expensive so I’ve got a super easy and super cheap DIY option for you, all you will need is a pair of cloth napkins or placemats, a hot glue gun, and some stuffing. Watch the video below to find out how to make these simple no-sew pillows! So easy and it only cost me $15!

6 items to make your house a home and a simple no-sew pillow diy | We're going to make it6 items to make your house a home and a simple no-sew pillow diy | We're going to make it

Craft Supplies: Last, but not least, we’ve got some craft supplies. If you haven’t noticed by my blog name and the fact that I just shared a DIY pillow, I’m a big craft lady. I like to keep busy with my hands and create things for my home so of course my home wouldn’t be complete without some supplies to do that. I like to have on hand some craft paper, a glue gun, yarn, pens/pencils, and some paint so I can craft away. Currently my craft supplies are stored in a big trunk but I’m hoping in my new home I’ll get a whole room dedicated to it! Now that would make my home a home!

6 items to make your house a home and a simple no-sew pillow diy | We're going to make it6 items to make your house a home and a simple no-sew pillow diy | We're going to make it

I hope you enjoyed our essentials that make your new house feel like a home. Comment below what your essentials are! Casper did not compensate for me for this post, I am truly intrigued by their company and hope to try it out in the future when I move!

SaveSave

DIY embroidered throw pillow | Popcorn and Chocolate

Embroidered Home Sweet Home Throw Pillow

DIY Embroidered Home Sweet Home Throw Pillow | Popcorn and Chocolate

I love coming home to a cozy house and a inviting couch full of fluffy throw pillows. This DIY embroidered throw pillow says it all – home sweet home. In my dream apartment I’ve got a huge couch just bursting to the brim with throw pillows to the point where you don’t know where to sit. This embroidered pillow will be sitting in the center of it.

DIY embroidered throw pillow | Popcorn and Chocolate

Doesn’t this pillow make you just want to curl up on the couch?? If so, you can find the full tutorial on how to make this DIY embroidered throw pillow over on Homedit.

Embroidered home sweet home pillow | Popcorn and Chocolate

Click here for the full tutorial.

Or pin this image if you want to check it out later! And if you are looking for more home decor DIYs click here!

DIY Embroidered home sweet home throw pillow | Popcorn and Chocolate

DIY Woven Wall Hanging | Popcorn & Chocolate

DIY Woven Wall Hanging

Learn how to make this DIY woven wall hangingDIY Woven Wall Hanging | Popcorn & Chocolate

As you may or may not know we have been selling some stuff on Etsy – mostly wall hangings and a few patches as of now. But we started the site out with woven wall hangings in mind. We are having so much fun making them and learning a lot of new stitches as we weave our way through a big pile of yarn. My room right now is overflowing with unraveled piles of yarn and the occasional tuft of wool that my dog likes to come in and drool all over.

Since we taught ourselves how to weave we thought we could teach you too! It is fairly simple and you actually don’t need too many supplies – just some sturdy cardboard, some yarn and maybe a needle. No need to go out and buy a huge expensive loom – just go to your recycling bin and find ourself a good piece of cardboard!

Click here for the full tutorial on how to make this woven wall hanging!

DIY Woven Wall Hanging | Popcorn & Chocolate

DIY Woven Wall Hanging | Popcorn & Chocolate

Sometimes starting a craft is hard because you feel like you need all these supplies and don’t necessarily want to go out and buy them just for one DIY. But chances are you already have some yarn lying around and if not it is fairly cheap at any craft store. So you have no excuses not to make this woven wall hanging! And, if you really insist, go buy one of ours 😉

DIY Woven Wall Hanging | Popcorn & Chocolate

You can find the full tutorial for this DIY woven wall hanging over on Homedit.

Summer pink flamingo painted doormat

Summer Pink Flamingo Painted Doormat

Pink flamingo painted doormat | Popcorn & ChocolateI don’t know about you guys but our summer has been a busy one. Both Rose and I are in a sort of transition period between jobs and apartments and it has put a lot of stress on both of us. We sadly (and begrudgingly) had to move out of our apartment together for the rest of the summer until we know what our next steps in life will be. We’ve both been busy bees and have tried to keep up with the blog and our Etsy as much as we can. We do have a few posts for you planned so stay tuned for some fun goodbye summer/hello school themed posts coming up. But, in the meantime enjoy this pink flamingo painted doormat that we made for Homedit. This DIY was the last to be done in our apartment and it seems fitting that it is a doormat that we can take to our next apartment (wherever that will be)! Summer pink flamingo painted doormat 
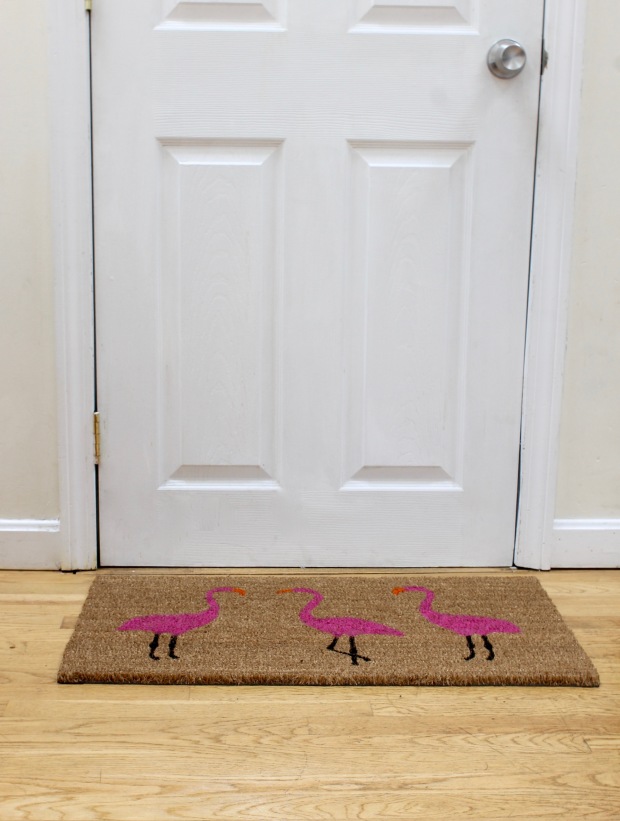
We are excited for what the future brings and hopefully your future will bring you this wonderful DIY summer flamingo painted doormat. It is easy to make and can be customized to any shape/animal/design that you want! We even provided free printouts of the stencil we used so you can simply print, cut, and paint! summer pink flamingo painted doormat | Popcorn & ChocolateWe hope you enjoy this fun summer DIY! I had a grand time making the flamingo cutouts and even stuck them up around our apartment afterwards for Rose to find. Anywaysss you can check out our DIY summer pink flamingo painted doormat over on Homedit or by clicking here. Let us know what you think and comment below what animal or design you would like on a doormat! IMG_1442

Flamingo Doormat | Popcorn & Chocolate