I’ve been seeing these top 10 posts of 2016 pop up all over my feed lately and was just dying to find out what Popcorn & Chocolate had in store. I can’t believe a whole other year has gone by. This year was full of some fun crafts we shared on our blog and some not so fun transitions and moves in our personal lives. Throughout it all we’ve always had our blog going, even if it has meant spending our whole weekend dedicated to taking pictures and creating crafts. I love the grind of blogging and wouldn’t have had it any other way. So, without further ado, here are our top 10 posts from 2016 with a bit of behind the scenes commentary as well (inspired by Laurel at A Bubbly Mess).
10. Free Thanksgiving Table Printables  As you make your way down the list you will see that this was the year of free printables. Since they seem to do so well we will definitely incorporate lots more in 2017! Behind the scenes: I sent this picture to Rose of me using our printable to plan my Thanksgiving. Double behind the scenes: my Thanksgiving was delicious (thanks for asking), Rose’s was a disaster as her thermometer exploded in the oven and ruined her whole turkey.
9. Flamingo and Swan Pool Float Costumes  I’m so glad you all loved these costumes as much as I did! They were a hoot to make and looked ridiculous on, which is a sure sign of a good costume. Behind the scenes: What you didn’t see with these pictures is us attempting to take them. I kept laughing at Rose behind the camera. I’m pretty sure she still has these costumes floating around her house…
8. Fruity Flower Pots Another favorite DIY of mine. These guys were super fun to make but also so fun to take pictures of. Some crafts just don’t want to go your way when you are photographing them, but these little gems were great. Behind the scenes: We used one fake air plant because Rose keeps killing all of ours. Before you scroll down to the next picture can you guess which one is fake from the 3 above?
7. Candy Cane Lawn Flamingos  Again, so glad you guys liked these silly candy cane flamingos! Behind the scenes: When I was making these my mom kept laughing at me every time I went outside to spray paint them. Then I left them drying propped up in our wheelbarrow in the garage so everyone saw them whenever they went in out of the garage. This was me on the day I photographed them – red nose and all. It was cold.
6. DIY Pom-pom Easter Baskets  Behind the scenes: these baskets were super easy to make but the hard part was finding the actual basket. We were at my house in NH and my mom had Easter baskets she was getting rid of so we were going to take them but forgot them so we scrambled all over Allston trying to find some cheap but decent looking baskets. We ended up finding these at the dollar store and they seemed to get the job done. Also, fun fact, we were in San Francisco when we wrote and published this post.
5. Colorful Etched Vases with Flower Puns and Sayings  This is one of our most popular DIY’s on Instagram as well so I’m not surprised to see it make it on the list. Behind the scenes: Oh, where to start? These vases damn near killed us. It was one of our first crafts we made for Homedit so we wanted to make them perfect. Well, we soon found that what we originally wanted to do, which was to have the etched words colored, would not, will not work. We were stubborn AF trying to figure out a way to make this work. We must have dyed a million jars with different solutions. Eventually we flew in the flag and just went the easy way out and spray painted them. So much easier.
4. Cactus Piñata  This was one of my all time favorite crafts to make. I mean, it’s a cactus piñata, what isn’t to love? I was smitten with it. Behind the scenes: See how proud I am of my piñatas? I made that Aries ram for Rose’s birthday and promptly named her Lucinda and the cactus Señor. I convinced myself that I had a hidden talent of piñata making… perhaps we shall see if this holds true in 2017??
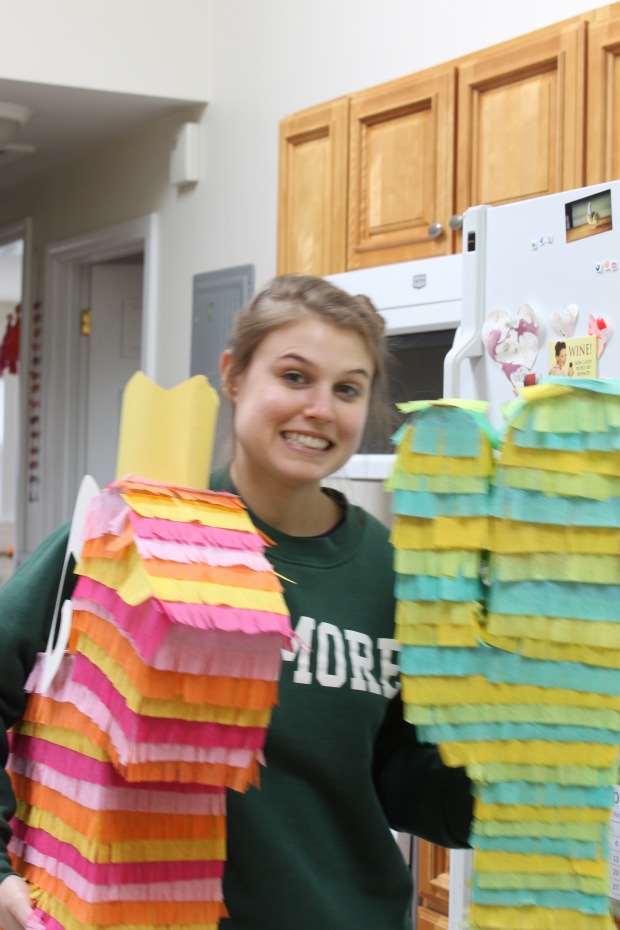
3. Nautical Hand-Painted Backgammon Board  This was another one I loved to make (and play)! It involved us going to the beach to take pictures, which is always a win in my book. Behind the scenes: the one problem with taking pictures at the beach is that it can be windyyy. Everything kept blowing around so we had to strategically place rocks and bags onto the towels. Unfortunately we couldn’t do the same with my hat…
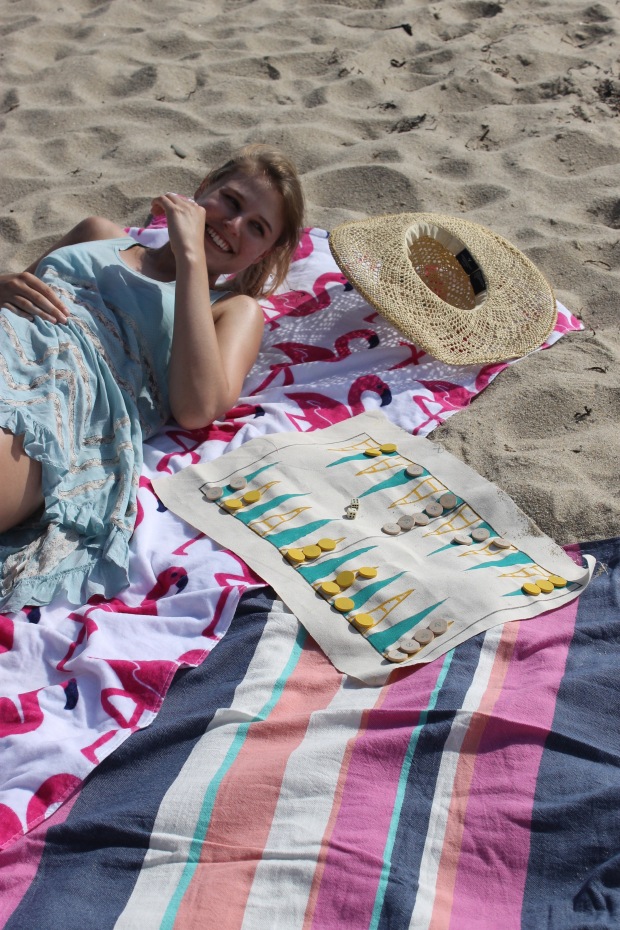
2. 2016 Printable Oscar Ballots  Another printable for the top! Behind the scenes: This ballot came out great but what you didn’t see were the countless hours we took to make sure everything was aligned nicely and that the colors were bold enough. Not to mention having to look up most of these movies as we hadn’t seen any of them… eek.
1. Printable Super Bowl 50 Commercial Bingo  I am not even surprised that this is the number 1 post of 2016. These bingo boards got us so much traffic, we were tootin’ our little horns we were so excited. You best believe we will be doing them again this year. It’s our little tradition since college so we gotta stick with it. Behind the scenes: Our other tradition is to make so.much.food. and eat it all through the whole game – just the two of us. Here was our spread: lots of veggies and apples(?), pretzel bites, a faux chicken tender (we thought we should have some protein), chips, and a huuuge bowl of a vegan cauliflower cheese dip. Sooo good. I think I eventually got up for dessert too. No shame.
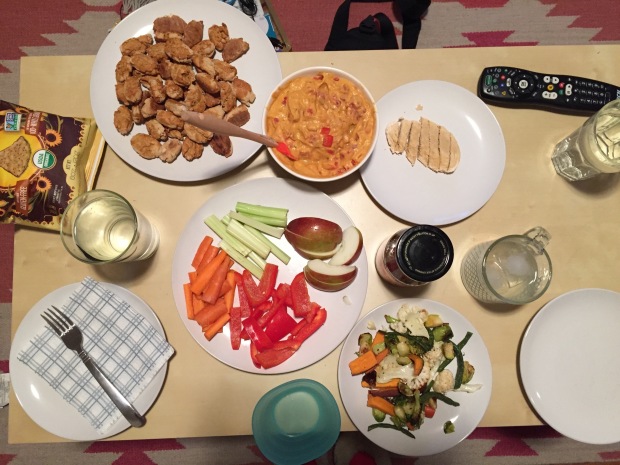
Anddd there you have it, our top 10 posts of 2016. I love looking back on our crafts and seeing which ones do well. I get so happy when I see that a craft I loved to make is popular. I hope you all are having a wonderful start to 2017 and hope you all stick around to see what we get up to this year. Let us know in the comments below which one of these DIY’s you liked the best!
 And, also, just because I couldn’t leave without sharing this little New Years behind the scene fail. Here is what I wrote without thinking when I was trying out the 2017 champagne bottles. I sent this picture to Rose but she was grocery shopping so I’m going to guess she didn’t notice I put 2007 either. #whatyearisit?
Like this:
Like Loading...


 Valentine’s/Galentine’s Day is coming right up! If you are still in need of a simple gift or a cute decoration keep reading to find out how to make these XO glittery wine stoppers!
 I feel like this year is just flying by… I say that every year, but how is it almost Valentine’s day already? I was happily celebrating my birthday last weekend in Portland, ME with Rose and I blinked and this week is already over! To be completely honest I’m not someone that really looks forward to the big v-day. Even when I was dating someone I never was super thrilled about the holiday.
  Don’t get me wrong, I love love love all the pink and hearts that are everywhere, just the actual day is a little cringe-worthy. I much rather celebrate by throwing a big Galentine’s day party with friends and eat sweets and drink wine and make some crafts, but tbh, I would always rather being doing that.
 These glittery XO wine stoppers would be the perfect decoration to add to your bar cart at your Galentine’s day party. Orrrr you could make the X’s and O’s ahead of time and let everyone decorate their own! Sometimes I think I’m a party planner. But doesn’t that sound like a fun party?? Drink some wine, craft, eat some popcorn and chocolate. Seems perfect to me.


 Let us know in the comments below what you are doing for Valentine’s day – even if that is just sitting on the coach and watching Netflix all day (we won’t judge)! Be sure to comment/like/subscribe if you enjoyed this post and feel free to pin it for later if you want to!

 We are taking a slight break from the typical
  Actually, this DIY flamingo piñata might do pretty well at a Galentine’s party if I do say so myself. It’s pink, it’s full of candy, it’s a flamingo – perfect for any party really.
 You might be wondering why I chose a flamingo piñata of all things. Well, to be perfectly honest, I’ve seemed to have collected or
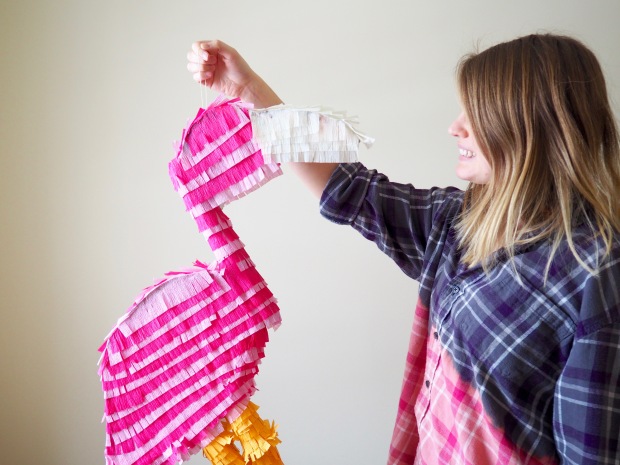 You also might be wondering why flamingos of all creatures. I’m not too sure tbh. Maybe it’s because they are pink or that they stand on one leg or that they have funny necks, who really knows – just call me crazy flamingo lady and leave it at that.
 I knew I wanted to make a piñata for my birthday since I made one for
  Materials:


 The moment you all have been waiting for is here… We have your free printable Super Bowl 51 commercial bingo cards for you! It has been our tradition to play bingo during the commercials of the super bowl every year, and since we couldn’t find very good bingo cards last year we decided to
  All you have to do is print out the bingo boards and the chips if you want to use our little footballs and helmets and put on the big game. We have made a total of 6 different boards so you can play with 5 other people. Or, if you are like Rose and I, you can each take 3 boards and man 3 different bingo cards.
 Last year we played with bits of popcorn as our chips but as they accidentally got eaten every once and a while we’ve opted to add some free printable chips as well. But, feel free to use anything you want – scraps of paper, m&m’s, beads – anything!


 These candy heart plant pots are the perfect gift to give away to your friends or coworkers on Valentine’s day. They are very quick and cheap to make so you could easily make a bunch to give away – or just make some for yourself to decorate your home with! Keep reading below to learn how to make these candy heart planters.
 Before I teach you how to make these candy heart planters I have a confession to make. I’m kind of freaked out by candy hearts. When I was in 4th grade around Valentine’s Day I was eating a bunch of these candy hearts, as kids do, and shortly after I was sent home sick with the flu. In my kid head I thought the candy hearts were what made me sick. Ever since then I’ve had a huge food aversion to candy hearts. I haven’t eaten them since 4th grade (and probably never will). I was traumatized.
  Though I refuse to eat candy hearts that doesn’t mean I won’t craft with them! I love the bright colors and the cute messages they have… just not so much the taste. They are certainly abundant in January and February so it’s kind of hard to avoid them, so my as well embrace them as I did here.
 If you do love candy hearts then this DIY is perfect for you! Quick and easy to make so you can give them away as Valentine’s Day gifts this year. Here’s what you will need:


 I am living in this iron-on slogan beanie because it is currently freezing here in New England. This morning it was 3 degrees. THREE.


 Lucky for you they are super easy to make and only involve a beanie, some iron-on letters and an iron. No sewing involved – my kind of craft!

 The best part about these slogan beanies is that you can choose what slogan you want on yours! I’ve gone with the appropriate permanent hat hair because that is me for 3 months of the year. I also have snow day because who doesn’t love a good snow day!? Lastly, I made a sleigh hat – more for Christmas, but could be worn all year round if you just want to be reminded to sleigh all day everyday.


 Ring in New Years this year with these 2017 glitter champagne bottles. They are easy to make and involve buying a bottle of champagne – my kind of craft! Keep reading below to find out how to make these 2017 glitter champagne bottles.


